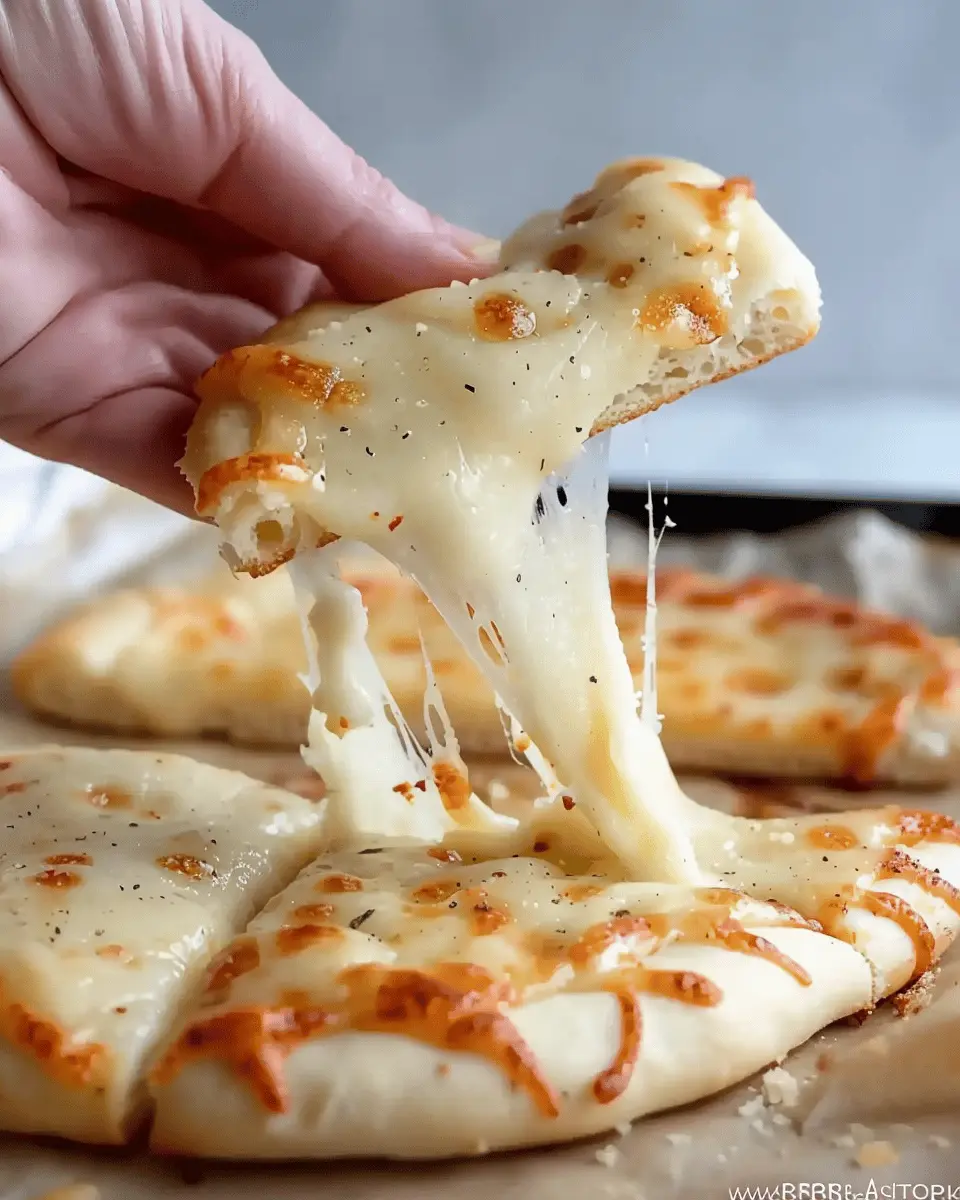
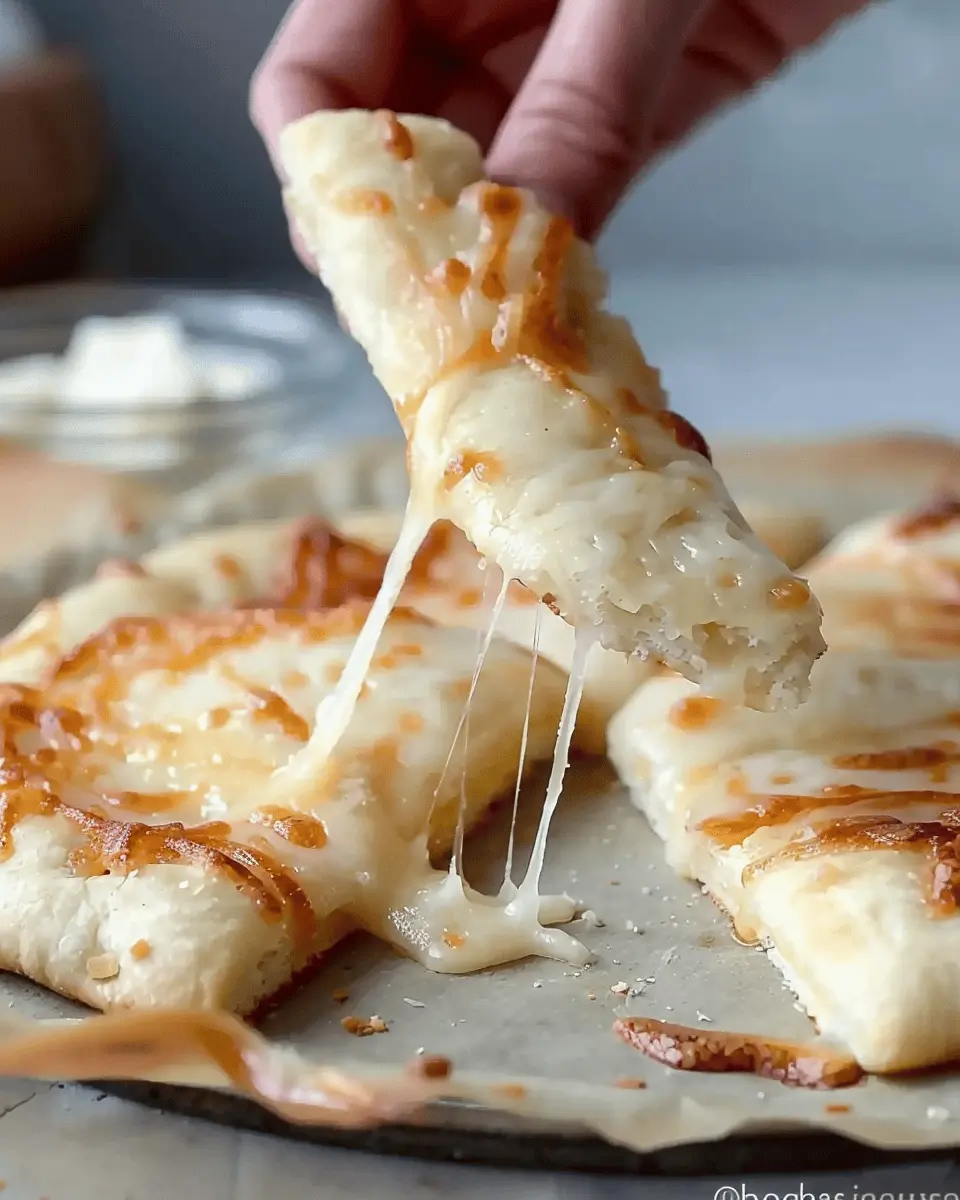
Introduction to Gluten Free Cheesy Breadsticks
When it comes to comfort food, few things rival the pleasure of cheesy breadsticks. They’re warm, gooey, and downright addictive—qualities that make them a beloved snack or side dish for many. But if you’re adhering to a gluten-free lifestyle, you might’ve thought those cheesy dreams were dashed. Enter gluten free cheesy breadsticks—the delightful solution that proves no one has to miss out on this classic!
Why gluten-free cheesy breadsticks are a game changer
Imagine biting into that soft, cheesy goodness without worrying about gluten. You’re not alone; according to the Celiac Disease Foundation, 1 in 133 Americans has celiac disease, and many more consider themselves gluten-sensitive. That means a significant number of people are on the lookout for satisfying gluten-free options. These breadsticks not only cater to this audience; they redefine how we enjoy cheesy bites.
Let’s break it down:
-
Flavor and Texture: Thanks to the right gluten-free flour blends, these cheesy breadsticks remain fluffy on the inside while being crispy on the outside. You don’t have to compromise on deliciousness.
-
Versatility: Want to jazz them up? You can add toppings like Turkey Bacon, Chicken Ham, or your favorite herbs and spices. The world of flavors is your oyster!
-
Easy Preparation: Even if you’re a beginner in the kitchen, making gluten-free cheesy breadsticks is simple and straightforward. It’s a fun recipe that can even get friends involved, creating a laid-back cooking night.
Now picture this: you’re hosting a cozy get-together, and everyone is enjoying these delicious snacks while sipping on a light sparkling beverage. Suddenly, you’ve become the culinary guru among your friends, all thanks to a dish that’s both scrumptious and gluten-free.
In a world where dietary restrictions can feel limiting, gluten-free cheesy breadsticks are a breath of fresh air. They blend comfort with inclusivity, allowing everyone at your table to partake in the indulgence. So gear up; the cheesy breadstick adventure awaits! Explore the possibilities and make your gatherings tastier with this delightful recipe!
Ingredients for Gluten Free Cheesy Breadsticks
Making delicious gluten free cheesy breadsticks is easier than you think! Here’s what you’ll need to whip up a batch that’s perfect for snacking or as a side dish.
Essential ingredients for the breadsticks
- Gluten-Free Flour Blend: Look for one designed for baking; it usually contains a mix of rice flour, tapioca starch, and xanthan gum.
- Cheese: Mozzarella is a classic choice for its meltiness. Consider sharp cheddar or a blend for added flavor.
- Baking Powder: To give the breadsticks a light, fluffy texture.
- Salt: Just a pinch to enhance the flavors.
- Olive Oil: Adds moisture and helps improve the texture of the dough.
Optional ingredients for extra flavor
Want to take your gluten free cheesy breadsticks up a notch? Think about adding:
- Herbs: Dried oregano or Italian seasoning can add a lovely aroma.
- Garlic Powder: For that irresistible garlicky punch.
- Turkey Bacon or Chicken Ham: Diced for a savory, meaty bite.
- Parmesan Cheese: A sprinkle on top before baking offers a tasty finishing touch.
Feel free to explore these options, and remember, the more you experiment, the more these bites will reflect your taste! For insightful tips, check out this gluten-free baking guide. Happy baking!
Step-by-Step Preparation of Gluten Free Cheesy Breadsticks
Making delicious and flavor-packed gluten free cheesy breadsticks at home is not just a culinary task; it’s a way to impress friends and satisfy cravings with a wholesome snack. Let’s walk through the steps to achieve this cheesy delight that’s perfect for any gathering or simply for a cozy night in.
Preheat Your Oven
Before diving into mixing and kneading, it’s essential to set the stage for baking. Preheat your oven to 425°F (220°C). This step minimizes wait time and ensures that your breadsticks can achieve that golden-brown perfection! While your oven warms up, you can gather and measure all your ingredients to streamline the process.
Mix the Dry Ingredients
Now that your oven is warming, it’s time for the dry ingredients to shine. Grab a large mixing bowl and combine the following:
- 2 cups gluten-free all-purpose flour
- 1 teaspoon baking powder
- 1/2 teaspoon baking soda
- 1 teaspoon garlic powder (for that zing)
- 1 teaspoon salt
Whisk these ingredients together until they are thoroughly integrated. This step is crucial because it ensures the leavening agents are evenly distributed, giving your breadsticks the lift and fluffy texture you desire. If you want to dive deeper into gluten-free flours, the Gluten Intolerance Group offers great resources here.
Combine Wet Ingredients with the Dry
Next, we’ll introduce the wet ingredients into the mix. Set the dry ingredient bowl aside and in another bowl, whisk together:
- 3/4 cup yogurt or your dairy-free alternative
- 1 large egg
- 1/2 cup shredded cheese (mozzarella is a classic choice!)
Once combined, pour the wet mixture into the bowl of dry ingredients. Stir gently until a dough begins to form; you might want to use your hands at the end to bring everything together properly. This process not only melds the flavors but also incorporates air, helping your gluten free cheesy breadsticks rise beautifully.
Form the Dough
With your mixed ingredients, it’s time to shape the dough. Lightly flour your work surface with some additional gluten-free flour to prevent sticking. Transfer the dough onto this floured surface and knead it for about 1 to 2 minutes until it’s smooth and elastic. Don’t be afraid to get your hands a little dirty; this is where the magic happens! If the dough feels too sticky, sprinkle a bit more flour as needed.
Shape the Cheesy Breadsticks
Time for some fun! Divide the dough into equal portions, usually about 8-10 pieces, depending on how thick you want your breadsticks. Roll each piece into long, thin shapes—think of it as making gluten-free Play-Doh!
For an added cheese burst, sprinkle more shredded cheese on top before placing them on a baking sheet lined with parchment paper. Alternatively, you can brush the tops with olive oil and sprinkle some Italian herbs for extra flavor.
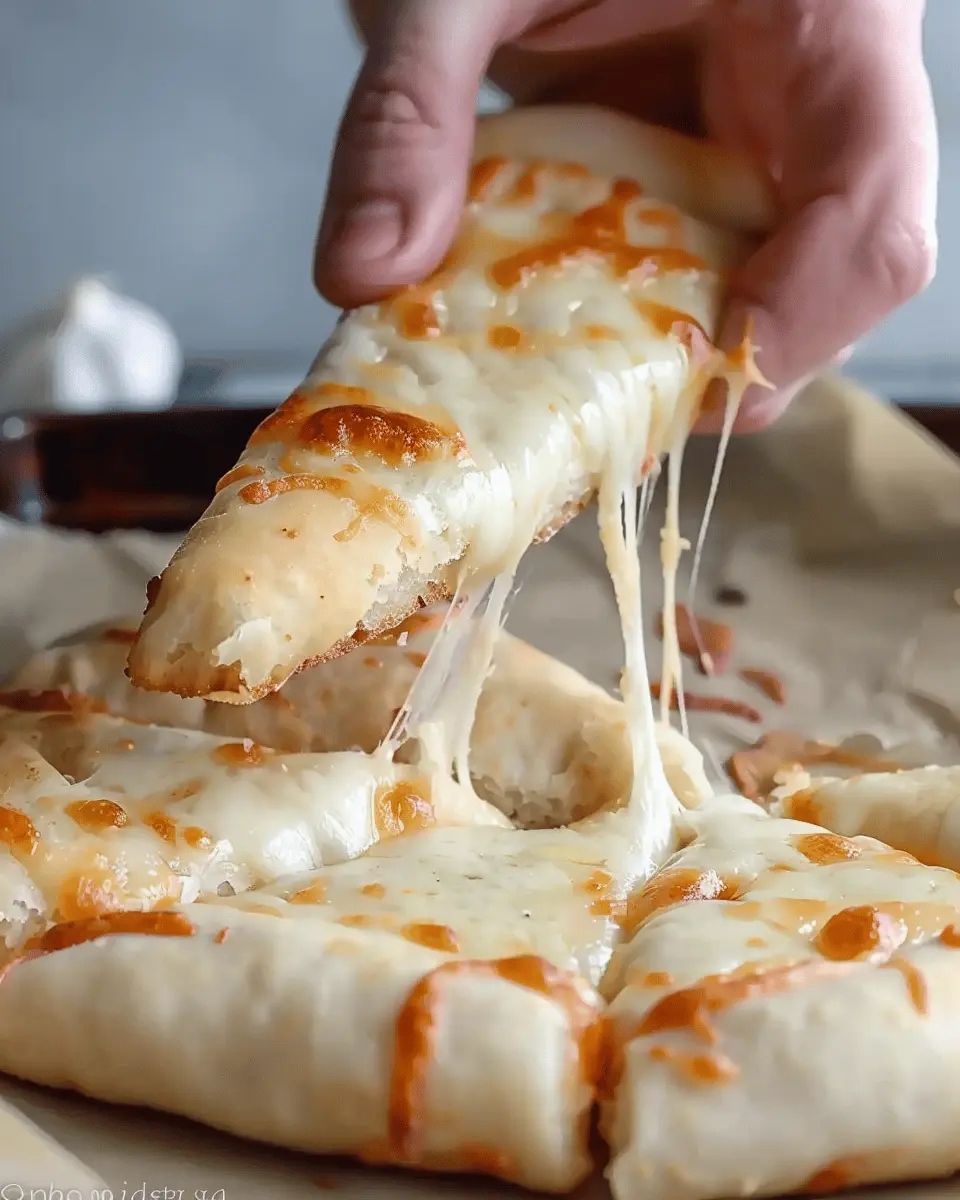
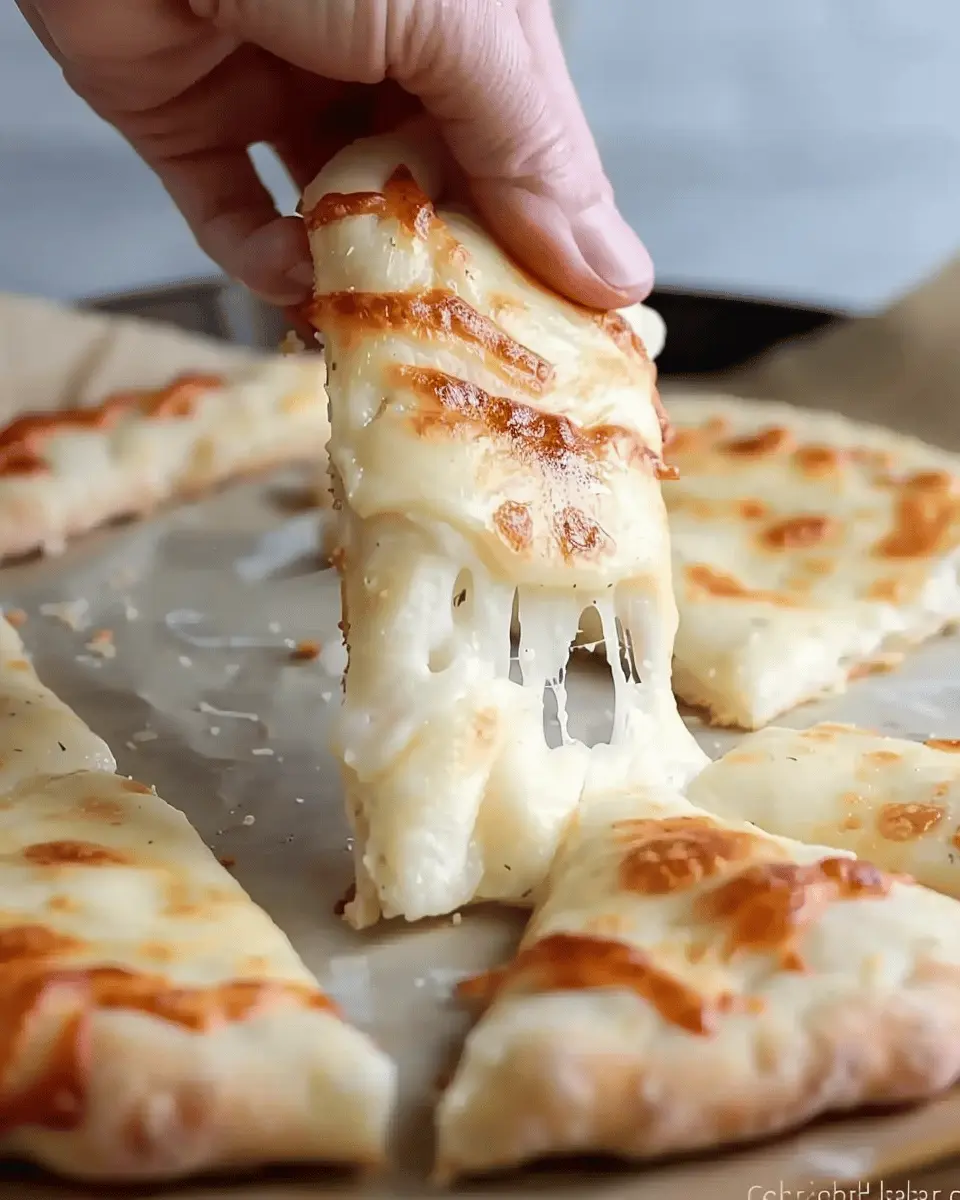
Bake to Golden Perfection
At this point, your oven should be nice and hot. Place your shaped breadsticks in the oven and bake them for about 12-15 minutes or until they are golden brown. The kitchen will soon become filled with the irresistible aroma of baked cheese and herbs. Keep an eye on them; each oven behaves differently, and you want to catch them just before they get too dark.
Once ready, remove these delightful gluten free cheesy breadsticks from the oven and let them cool slightly before indulging. Serve them warm with your favorite marinara sauce or dip, and don’t be surprised if they disappear in a flash!
Baking doesn’t need to be intimidating, especially with these simple steps. Enjoy your homemade cheesy breadsticks and consider sharing the joy by inviting friends over for a cheese-filled snack night!
Variations on Gluten Free Cheesy Breadsticks
When it comes to gluten free cheesy breadsticks, the possibilities are endless! Let’s dive into some delightful variations that can enhance flavor and cater to different tastes.
Herb-Infused Cheesy Breadsticks
Transform your cheesy breadsticks by adding an array of fresh herbs! Think rosemary, thyme, or even a bit of basil. Simply mix your chosen dried or fresh herbs into the dough or sprinkle them on top before baking. This not only adds a burst of flavor but also a beautiful aroma that wafts through your kitchen. For a deeper dive into herb cooking, consider checking out sources like the Herb Society of America for tips on flavor pairings.
Spicy Cheesy Breadsticks
Craving a kick? Add a dash of spice! Incorporate crushed red pepper flakes or even a bit of jalapeño puree into your dough. Pairing these gluten free cheesy breadsticks with a spicy dipping sauce can elevate the experience even further. A simple garlic-infused olive oil or a zesty marinara can complement the heat perfectly. Spice up your meal prep with this easy variation that’s sure to ignite your taste buds!
Cheesy Breadsticks with Turkey Bacon
What could be better than combining the scrumptiousness of turkey bacon with your gluten free cheesy breadsticks? Simply chop cooked turkey bacon and fold it into the dough, or layer it on top before baking. The savory and smoky flavor of turkey bacon adds a wonderful twist. For a fun personal touch, consider hosting a taste-testing session with friends to see which variation they prefer!
Feel inspired yet? These variations not only keep things exciting but also cater to various dietary preferences, allowing you to enjoy cheesy breadsticks in a whole new way!
Cooking Tips and Notes for Gluten Free Cheesy Breadsticks
Tips for Achieving the Perfect Texture
When it comes to crafting gluten free cheesy breadsticks, texture is key. To get that delightful chewiness, consider the following:
- Use a Blend of Gluten-Free Flours: Combining almond flour and tapioca starch can enhance the elasticity, giving your breadsticks a more authentic texture.
- Incorporate Psyllium Husk: This ingredient acts as a binder and adds a chewy quality. It’s a game changer!
- Don’t Skip the Rising Time: Allow your dough to rest for about 20 minutes before baking. This helps to develop flavor and improve the texture.
Notes on Ingredient Substitutions
Making gluten free cheesy breadsticks can be flexible! If you’re missing some ingredients, here are a few substitutions:
- Cheese Options: Instead of the classic mozzarella, try cheddar or a dairy-free cheese for a unique flavor twist.
- Fat Choices: For a dairy-free version, use olive oil or coconut oil instead of butter.
- Alternative Toppings: Don’t hesitate to experiment with toppings like turkey bacon or chicken ham, or even a sprinkle of rosemary for an aromatic touch.
For more details on gluten-free baking, check out this helpful article. Happy baking!
Serving Suggestions for Gluten Free Cheesy Breadsticks
Pairing with sauces
When it comes to gluten free cheesy breadsticks, the right dipping sauce can elevate your tasting experience. Consider classic pairings like marinara or garlic butter for that Italian flair. Pesto is another vibrant option, adding a burst of flavor. If you’re feeling adventurous, a spicy sriracha mayo or creamy ranch can bring a delightful kick!
For those who enjoy experimenting, try making a balsamic reduction—a drizzle of this tangy syrup can add sophistication to your snack. Adding herbs or spices to your sauces lets you tailor them to your taste, making each bite an adventure.
Ideal accompaniments for a meal
These gluten free cheesy breadsticks truly shine when served alongside a hearty salad or light soup, like a fresh garden salad or creamy tomato bisque. They also pair wonderfully with grilled meats or roasted vegetables, creating a balanced meal. For a cozy night in, serve them next to your favorite comfort foods like a creamy risotto or a savory casserole.
Want to take your meal up a notch? Check out EatingWell for more ideas on perfect pairings!
Time Breakdown for Gluten Free Cheesy Breadsticks
Preparation Time
Getting started with your gluten free cheesy breadsticks is a breeze! You’ll need about 15 minutes for prep. This includes gathering ingredients, measuring, and mixing the dough. Don’t forget to preheat your oven while you work—the warm-up time actually helps keep your focus sharp!
Baking Time
Once your dough is ready, it’s time to bake! Let those cheesy delights crisp up for about 20-25 minutes. Keep an eye on them; you want that golden-brown finish without over-baking. It’s all about timing and experience!
Total Time
All in all, you’re looking at just about 35-40 minutes from start to finish. In less than an hour, you’ll have freshly baked gluten free cheesy breadsticks perfect for snacking or sharing with friends. Pair them with a homemade marinara sauce or garlic butter for an extra flavor kick! If you want to learn more about gluten-free baking, check out this guide from the Gluten Intolerance Group. Happy baking!
Nutritional Facts for Gluten Free Cheesy Breadsticks
When it comes to indulging in gluten free cheesy breadsticks, knowing the nutritional aspects can help you make informed choices. Here’s a quick breakdown:
Calories
Each serving of these cheesy delights typically contains around 150-200 calories. This makes them a satisfying snack or a fun addition to your meal without breaking the calorie bank.
Protein
Packed with a cheesy punch, you can expect these breadsticks to offer about 6-8 grams of protein per serving. This boost can help with muscle repair and keep you feeling full longer.
Carbohydrates
On average, a serving consists of 15-20 grams of carbohydrates. While ideal for energy, it’s a good idea to enjoy them in moderation and balance them with other nutritious foods.
For more detailed nutritional insights, you might want to check out resources like the USDA FoodData Central and NutritionData to help fine-tune your dietary needs. By simply knowing how these delightful gluten free cheesy breadsticks fit into your daily diet, you can enjoy them guilt-free!
FAQs about Gluten Free Cheesy Breadsticks
Can I make these breadsticks ahead of time?
Absolutely! Making gluten free cheesy breadsticks ahead of time is a fantastic option for meal prep or entertaining guests. You can prepare the dough and shape the breadsticks, then store them in an airtight container in the fridge for up to 24 hours before baking. Just be sure to let the dough come to room temperature before popping them into the oven. This will ensure they bake evenly and rise nicely.
How can I reheat leftover breadsticks?
Leftover gluten free cheesy breadsticks can be reheated easily to bring back their warm, cheesy goodness. The best method? Preheat your oven to 350°F (175°C) and place the breadsticks on a baking sheet. Heat them for about 8-10 minutes, or until they’re warmed through and slightly crispy again. If you’re in a hurry, you can also reheat them in the microwave for about 30-60 seconds, but keep in mind that this may make them a bit softer.
What’s the best way to store gluten-free cheesy breadsticks?
To maintain the freshness of your gluten free cheesy breadsticks, store them in an airtight container. They can be kept at room temperature for up to two days, but if you need them to last longer, consider refrigerating them. For even more longevity, freeze them! Just wrap the breadsticks tightly in plastic wrap and then place them in a freezer-safe bag. They can be stored in the freezer for up to 3 months. When you’re ready to enjoy, simply thaw and reheat!
For more tips on gluten-free baking, check out Celiac Disease Foundation for resources and a community of fellow enthusiasts.
Conclusion on Gluten Free Cheesy Breadsticks
Recap the joys of homemade gluten-free cheesy breadsticks
Making gluten free cheesy breadsticks at home is not just a culinary task; it’s a delightful experience that brings the comforting taste of cheesy goodness right into your kitchen. There’s something incredibly gratifying about crafting these tasty treats from scratch, especially when you pull a golden, cheesy batch from the oven.
Not only do these breadsticks pair perfectly with a hearty soup or an exciting salad, but they’re also a hit at parties or cozy nights in with friends. Plus, customizing them with your favorite toppings—like Turkey Bacon or Chicken Ham—makes every bite a new adventure!
Don’t miss out on the joy of homemade snacks; explore your creativity and savor the flavors! For more ideas on healthy snacks, you can check out Healthline for tips and recipes that cater to a gluten-free lifestyle.
Gluten Free Cheesy Breadsticks: The Best Homemade Treat
Deliciously cheesy and perfectly gluten-free, these breadsticks are a must-try for anyone looking for a tasty homemade treat.
- Prep Time: 15 minutes
- Cook Time: 20 minutes
- Total Time: 35 minutes
- Yield: 12 breadsticks 1x
- Category: Bread
- Method: Baking
- Cuisine: American
- Diet: Gluten Free
Ingredients
- 2 cups gluten-free all-purpose flour
- 1 tablespoon baking powder
- 1 teaspoon salt
- 1 cup shredded mozzarella cheese
- 1/2 cup milk
- 1/4 cup butter, melted
- 1 teaspoon garlic powder
- 1/2 teaspoon Italian seasoning
Instructions
- Preheat your oven to 400°F (200°C).
- In a large bowl, mix the gluten-free flour, baking powder, and salt.
- Stir in the mozzarella cheese until well combined.
- Add the milk and melted butter, mixing until a dough forms.
- On a floured surface, roll out the dough to your desired thickness.
- Cut into breadstick shapes and place on a baking sheet.
- Sprinkle garlic powder and Italian seasoning on top.
- Bake for 15-20 minutes or until golden brown.
Notes
- Serve warm with marinara sauce for dipping.
- These breadsticks are best eaten fresh but can be reheated.
Nutrition
- Serving Size: 1 breadstick
- Calories: 150
- Sugar: 0g
- Sodium: 200mg
- Fat: 8g
- Saturated Fat: 5g
- Unsaturated Fat: 3g
- Trans Fat: 0g
- Carbohydrates: 15g
- Fiber: 1g
- Protein: 6g
- Cholesterol: 20mg
Keywords: Gluten Free Cheesy Breadsticks, homemade breadsticks, cheesy breadsticks